Pages

Tuesday, January 31, 2012

February Preschool Activities


Here are some preschool age activities to do with your kids at home during the month of February. These ideas are sent home each month with Hudson from his preschool. You could put these on a calender or fill a jar with each activity written on paper. Have your child choose an activity from the jar during the week.

  • Help Mom and Dad find out if the groundhog saw his shadow
  • Sing or say the days of the week to Mom and Dad
  • Help with 2 chores around the house today
  • Use crayons to make a rainbow. What colors did you use?
  • Count as high as you can out loud
  • Find the letter Rr in a story you read with Mom or Dad
  • Count how many windows are in your house
  • Practice cutting by making paper hearts
  • Tell each member of your family why you love them
  • Sort skittles by color
  • Make a pattern with stickers
  • Put shaving cream in a bag and practice making shapes
  • Try a new food. Did you like it?
  • Sort a handful of coins
  • Have Mom or Dad make flashcards 1-15. How many do you know?
  • Practice brushing and flossing your teeth
  • Draw a picture of something that starts with the letter T
  • Count how many doors are in your house
  • Practice writing your name
  • See what shapes you can find around the house

Saturday, January 28, 2012

Juicing Recipe

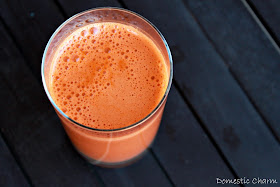
 So this is what I had for breakfast this morning...usually on Saturday mornings we make pancakes, but this morning we juiced instead. I found this recipe from My New Roots and she has lots of great juicing recipes and insight HERE! The flavor of this combination of juices was pretty good! It's just always hard for me to drink the whole glass...as I get about halfway through it gets harder and harder to drink! We have not committed to doing a juice fast, but are going to try to juice more often to get extra fruits and veggies in our diet.

We also purchased our first Bountiful Basket today! Bountiful Baskets is a Food Co-op that distributes produce baskets weekly. You can find more information on their website, HERE. The have many locations in different states and if you are looking for a good deal on lots of fruits and veggies then it might be for you. The only catch is that you do not know what you'll be getting in your basket. You can add on to you basket if you want more veggies, breads, fruit, ect. But each basket (you bring a laundry basket) is an assortment of vegetables and fruits.

 1 sweet potato, 4 stalks of celery, 5 carrots, 1 apple, and ½ lemon

Wednesday, January 25, 2012

Growing Grass

 Hudson and I planted grass seed the other day and I never took pictures when we started, but now that the grass is growing I thought I would post some. He gets so excited each morning when he sees how much is has grown, it's really cute! The seed took 3-4 days to start sprouting, but once it started it has not stopped! We used cat grass seed, but you could choose any kind you find. Rye grass seed also grows really fast, about 3-5 days. Here is what you'll need:
  • Grass seed
  • Empty baby food jar
  • Potting soil
  • Water
Have your child fill the jar with potting soil and following the directions for whichever grass seed you're planting, place the seeds in the soil. Place some more soil over top. Water the seeds and place in the sunlight, by a window. Watch and wait for it to grow!

 It was fun to have it planted in the glass jar, because Hudson was able to see all of the roots from the grass growing throughout the soil.

Sunday, January 22, 2012

Cloud Dough

 I made this cloud dough for Hudson to play with and got the recipe from Pre-School Play via I Can Teach My Child. All it is, is a mixture of flour and baby oil! It feels super soft in your hands and sticks together like wet sand would. Hudson pretended to make cupcakes and cakes with his, and I gave him some paper straws to use as pretend candles. I made a batch last week for him to play with outside in his sand table. Today I made a few batches for him to play with inside in a large bin on the floor.

You will need just flour, baby oil, and a container for mixing. I made smaller batches and used this Tupperware that already has the 32oz (4 cup) measuring marked. That made it easy to just fill to the line and add the baby oil.

Mix together:
4 Cups Flour
with
1/2 Cup Baby Oil
(easy to double or make as many batches as you need to fill a play tub)

Stir together until it looks like little crumbs and oil is absorbed. I used a spoon at first, then just mixed it with my hands.

I placed a large plastic bin on top of a vinyl tablecloth on out floor for Hudson to play with the dough in. Some of it made it to the red mat, but it was easy to pour it back into the bin when he was done.

I gave him an old muffin tin, cookie sheet, spoon, play cups, bowls, and some paper straws to use as pretend candles. I think you can make this activity new and different each time by changing out some of the play tools that they use with the dough.

Hudson had fun playing and Max liked feeling the cloud dough too, just had to make sure it didn't go in his mouth. I ended up making 3 or 4 batches of the cloud dough to fill his tub.

I made this label when I made some of the cloud dough as a gift. You can save the image and print onto card stock or I printed it onto labels. I put one on a gift tag and tied to a mason jar. Then I used another label to place on Hudson's Tupperware of cloud dough. Would be cute to use as a tag for party favors too. You can add the child's name onto one of the clouds.


Shaving Cream Art

 This a fun kids craft using shaving cream and paint. Hudson's preschool class made these, however they did it when Hudson was out sick with chicken pox. So I thought I would try it at home! It reminded me of the Milk Art Craft I did with Hudson a while ago. However, with this one you are actually able to keep your designs on paper!

 
 You will need:
Shaving cream, afew different colored paints, old cookie sheet or tray, white card stock paper, toothpicks, and a spatula.

 First spray the shaving cream onto the cookie sheet.

 Then spread it using the spatula to be about the size of your piece of paper.

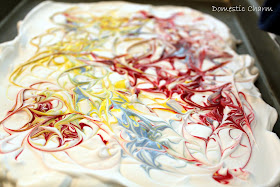
 Squeeze the paints onto the shaving cream. You can experiment with how you place them.

 You can make dots, lines, or swirl is around. How you place the paint can change how your picture looks. 

 Using a toothpick swirl the paint around in the shaving cream. 

 It should look something like this!

 Then place your paper on top of the designs. Press down gentle so all the paint touches the paper. 

 Peel the paper off and it will look like this. Using the spatula scrape the shaving cream off of the paper. 

 Then you will have your paper with the swirly designs on it! Let it dry and then you can use the paper for another fun craft.

Thursday, January 19, 2012

January Preschool Activities

I am a little late on posting this, but here are some ideas of things to do with preschool age kids at home. Hudson's preschool sends home a calendar every month with ideas on it for each weekday. What we are sent home with coordinates with what they are learning about in school. Would love to hear any ideas of simple activities that you have been doing with your young kids at home! I have added a few of my own to the list.

  • Draw a picture of something you did over winter break
  • Help Mom or Dad make dinner
  • Find things in the house that begin with letter N
  • Talk about MLK Jr. and dreams and ambitions
  • Have a family member read to you for 10 minutes
  • Make patterns out of stickers
  • Practice rainbow writing your name
  • Trace the numbers 1-15
  • Practice putting on and zipping your coat
  • Practice counting as high as you can
  • Cut pictures from a magazine and create a winter scene
  • Find 5 things that are white
  • Make bathtub paint with shaving cream and food colors, paint a picture in the tub
  • Make a bird feeder with a pine cone, peanut butter, birdseed, and yarn. Hang it in a tree in your backyard
  • Sit and take turn telling stories with Mom or Dad


Wednesday, January 18, 2012

10 DIY Kids Valentine Ideas

 Pop Rocks Valentine by Fiskars

 Superhero Valentine by Zakka Life
(tootsie pops)

Crush Photo Valentines via Design AGlow
(crush soda)

 Pencil Valentines by Simply J Studio

 Eye Love You Valentines via I Must Have Cute

 Monster Valentines by Make and Takes

 Mustache Valentine by Craft Monkey

 "O-Fish-Ally Be Mine" Valentine by Tammy Mitchell

 Valentine Kisses by I am Momma Hear Me Roar

 Lollipop Valentines by Design Mom

I am loving all of these creative DIY Valentines! Found them via Pinterest and have provided the links to all the sources where you can find more information. Some have provided free printables and tutorials!

Raw Tacos

This is what we ate for dinner tonight and they were AMAZING! The recipe is from Sarah at My New Roots, an amazing food blog with tons of tasty and healthy recipes and tips. You can find the recipe here. The tacos are made with all raw ingredients, and packed full of flavor! The salsa is full of fresh veggies and you top the tacos with a cashew "sour cream". Instead of meat you make a walnut taco mix, which is loaded with omega-3 fats and health benefits. Sarah shares some really interesting health benefits on her blog! You've got to try this recipe, so yummy!

Tuesday, January 17, 2012

A is for Apple

I bought a couple 3 lb bags of organic apples the other day and got around to making some homemade apple sauce today. Hudson has been all about eating apples lately so I thought is would be fun to make applesauce together and do a craft. While the applesauce was cooking Hudson made some apple stamps. Here is what you'll need for the craft and you can find the applesauce recipe below:
  • 1 apple, cut in half
  • Red paint
  • Paper plate
  • 2 pieces of paper, (we used red and white)
  • Scissors
  • Glue
  • Marker
 Cut the apple in half and pour some red paint on the paper plate. Have your child dip the apple in the paint and press the apple onto the paper. While they are stamping the paper cut out an uppercase and lowercase letter A out of construction paper. Have your child glue the letters onto the paper. Then I had Hudson write out Apple at the bottom of the paper as we sounded and spelled it out together.


Homemade Organic Applesauce
Hudson was able to help a little while making the applesauce. He counted out the apples and sorted them by colors. Then placed them in the pot as I peeled and chopped them. However, about halfway through he snagged one of the apples and had himself a little snack while I finished up.


I made the applesauce with organic apples, however you could use non-organic apples. We also did not add any extra sugar, just a little bit of honey. But you could add 1/2 cup brown or granulated sugar to it. 
Here is our recipe:
  • 3 lbs of organic apples (about 6-8 total, we used half Gala and half Granny Smith)
  • 3/4 cup organic fresh pressed apple juice, or you can use water
  • 1 to 2 teaspoons cinnamon
  • 2 tablespoon freshly squeezed lemon juice
  • 3 tablespoons Honey

Peel and slice the apples. Place them in a large pot with the apple juice or water, cinnamon, lemon juice, and honey. Stir together. Cook on the stove top on medium high until it begins to simmer. Reduce the heat to low and cook for about 12-15 minutes. Once the apples are soft use a potato masher to mash them to your desired consistency. I like homemade applesauce chunky, but if you want it to be really thin you could run the cooked apples through a food processor until smooth. Serve warm or cold.

Thursday, January 12, 2012

God Created Light: Kids Craft

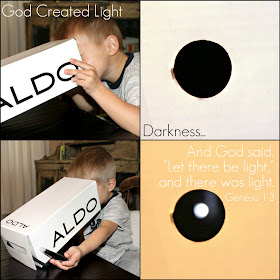
 So I came across this amazing blog the other day while on Pinterest and this Bible craft is from the blog. The blog is I Can Teach My Child and it is loaded with tons of awesome educational crafts and activities to do with your kids. They are even divided up by ages. This light box craft is part of a series on her blog for teaching about the seven days of creation. You can find the lessons for all seven days here. There are also videos of really cute songs that you can sing with your child for each day.
I plan to go through these with Hudson, he enjoyed the "day one" activity today. You can find all the details for the day one lesson here.


“In the beginning God created the heavens and the earth.  Now the earth was formless and empty, darkness was over the surface of the deep, and the Spirit of God was hovering over the waters.

And God said, “Let there be light,” and there was light. God saw that the light was good, and he separated the light from the darkness.  God called the light “day,” and the darkness he called “night.” And there was evening, and there was morning—the first day.”
 
-Genesis 1:1-5