Saturday, April 23, 2011

Easter Egg Hunt


We had an Easter Egg Hunt this morning for the kids at the park. We asked everyone to pack a lunch and join us for an Easter Egg Hunt. Alexis planned a craft for the kids, they colored and decorated bunny ears. She cut strips of paper to wrap around the kid's heads then stapled ears to it. The kids decorated the ears with stickers and pom poms. I made lemon cupcakes with buttercream frosting. I made chicks out of fondant to place on top of some and used a grass tip to decorate the others. Then placed jelly beans in the "grass" and a cupcake pick in each one. I found the printable decorations on Catch My Party by Autumn Leah Designs. It was a fun morning, thanks everyone for coming!

Friday, April 22, 2011

Superhero Bedroom

I love this Superhero bedroom created by Cheri Heaton for her 3 year old son. You can check out Cheri's blog, I am Momma, Hear Me Roar here. I stumbled across this super cute superhero bed on Ohdeedoh. I might need to remember this bed design for in the future for Hudson or Max.

Michael's Coupons

Click here for a 50% off one regular priced item coupon at Michael's, however it is for today only.
Click here for a 30% off your whole purchase valid on April 23rd only.

Thursday, April 21, 2011

Unique Mother's Day Gifts

Necklace on Etsy by La Vieja Tun Tun 
$45.00 find it here 

Mug Rug on Etsy by Fortheloveofjoy
$10.00 find it here.

 
Cake Stand on Esty by E. Isabella Designs
$36.00 find it here.
Handmade Recipe Box on Etsy by ErinsArtwork
$22.00 find it here


Children's Place

Need a last minute Easter outfit for the kids, print this or take in the offer codes when you shop.Valid April 21-23.

Wednesday, April 20, 2011

Coloring Easter Eggs


Hudson and I colored some Easter eggs this afternoon. I bought organic brown eggs and wasn't sure how they would color with the dye. However, the colors came out very bright and beautiful! I also added 3 tablespoons of vinegar to the water and food coloring to brighten the colors. Hudson had fun coloring the eggs, but really what he was more excited about was eating them.

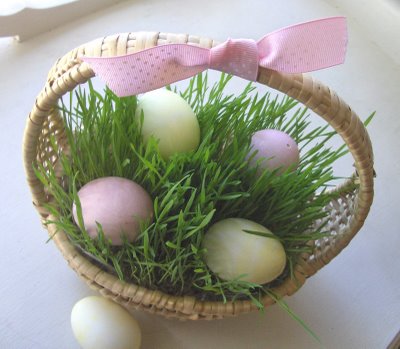
Living Easter Basket


I originally heard about this idea from my Mom. When I searched it online I found step by step directions here on Ecobuzzla.com. I think this is a really cute idea and something that a young child would get excited about. We planted grass seed with Hudson a few weeks ago and he was so excited when it finally sprouted! It only took ours about 2-3 days to start growing, however I think that seemed like an eternity to Hudson since he was checking to see if it has grown about every 10 minutes! 
 
Here's What You'll Need:
  • Baskets – Or you can incorporate another craft into the living Easter Basket project and make your own baskets out of egg cartons, recycled construction paper or paper grocery bags.
  • Basket liner – Use naturally waxed paper (conventional waxed paper is coated with petroleum based paraffin wax), a plastic bread bag or other plastic bag that you’d be tossing anyway or a reusable planting tray from your local nursery that will fit inside the basket (don’t forget to take the baskets to the nursery with you for size comparison if you decide to use a planting tray).
  • Organic potting soil
  • Organic seeds – Use any organic grass seed of your choice.  Wheatgrass grows quickly and is great for juicing.  You can also try oat or rye grass. Check your local Whole Foods or plant nursery for organic grass seeds.
Steps:

1.  Line the baskets with your liner of choice – waxed paper, egg carton material, reused plastic or reusable tray.
2.  Fill the lined basket with two inches of organic potting soil.
3.  Sprinkle grass seeds over the top of the soil.
4.  Sprinkle just enough soil over the seeds to cover them.
5.  Water daily.
Keep the baskets in a spot where they won’t be disturbed and be sure to keep the soil moist.  In a few days the seeds will sprout and you can move the basket to a sunny spot.  Continue to water and within two to three weeks (7-10 days for wheatgrass) you’ll have a beautiful bed of grass.
After your Easter celebration you can let the cats enjoy their own patch of “kitty grass” or you can gently move your homegrown grass to a spot outside and watch it continue to grow.  If you used wheatgrass you can juice it!  Or throw it in your compost pile (after it’s dried out).
Check back for more ways to celebrate Easter naturally.

Directions and picture from ecobuzzla.com

Tuesday, April 19, 2011

Cake in a Jar


I am loving the cake in a jar idea, and when I saw the rainbow cake in a jar at The Family Kitchen I knew I had to find a reason to make some! They also posted a Easter colored tie-dye cake in a jar that you can find here. I combined their ideas from both to create my own. You can find the recipe and directions at the above links.


Wednesday, April 13, 2011

Easter Toppers

I love these toppers by eighteen25 for an Easter treat. You can download the peeps topper here for free! And the bunny tails topper can be found here. These would make cute party favors for a kids Easter party.

Tuesday, April 12, 2011

Pizza Party

 Ina's White Pizza with Arugula
 Antipasto Platter with Grilled Vegetables

 Sparkling Sidecar

I love the idea of having a pizza party with homemade pizzas. These recipes are found on the food network under Spring Entertaining. Giada de Laurentiis also has some homemade pizza recipes here and here.

Monday, April 11, 2011

Cake in a Jar

I've been making cakes for the last couple years, however I never knew that you could bake a cake in a jar! I LOVE this idea! Especially this rainbow cake, it's so fun to see all the colors through the glass.  One more wonderful idea that you can use a mason jar for! Check out the recipe for the rainbow cake in a jar at The Family Kitchen. The Cupcake in a jar is such a great way to present cupcakes in a fun way, and easy to take on the go! These are from The Cake Plate found on Intimate Weddings.

Sunday, April 3, 2011

Cinnamon Sugar Popcorn

This popcorn is AMAZING! You make it in the whirley-pop popcorn maker.

Combine in the Whirley-Pop:
  • 1/4 cup white popcorn kernals
  • 1/4 cup oil
  • 1/4 cup sugar
Cook over medium heat while stirring with lid closed until done. Once the popcorn is done add the cinnamon sugar mixture and stir for 2 minutes with the lid closed.

Topping Mixture:
  • 2 tablespoons sugar
  • 1 teaspoon cinnamon
  • 1/4 teaspoom salt
Making 

    Sunday, March 6, 2011

    Coconut Mojito

    I don't like a lot of drinks, but I do love Mojitos, and I also love Pina Coladas! So when I saw this recipe for Coconut Mojitos in People Magazine I had to write it down. I have been saving it for a while now and finally got to try it out now that I am no longer pregnant! They are really good and sweet; just how I like my drinks.

    Makes one drink

    Ingredients:
    • 8 mint leaves
    • ½ lime, cut into 4 wedges
    • ¼ cup coconut rum
    • 2 tbsp. sour mix
    • 1 tbsp. coconut cream, such as Coco Lopez
    • ¼ cup lemon-lime soda
    • ¼ cup club soda
    Place mint leaves and 3 lime wedges in a cocktail shaker and muddle. Add rum, sour mix and coconut cream, then fill shaker with ice. Close and shake well. Strain mixture into a glass, and top with lemon-lime soda and club soda. Garnish with a lime wedge.

    SERVING TIP: Serve in Mason Jar Mugs, $24 for a set of 6; potterybarn.com

    Sunday, February 13, 2011

    Peanut Butter Granola Bars

    I made these for Hudson as a snack and thought they turned out pretty good! You can alter the recipe to make it healthier by adding a dried fruit in place of the chocolate chips. I also saw on a review for the recipe that someone replaced the butter with canola oil. I needed to bake mine a little bit longer then the 15 minutes that the recipe calls for to keep them from falling apart. Refrigerating them may also help to keep them from falling apart. 

     Ingredients:

    • Vegetable cooking spray
    • 1 egg white
    • 1/2 cup chunky peanut butter
    • 1/3 cup brown sugar
    • 1/4 cup honey
    • 1/2 cup (1-stick) unsalted butter, melted
    • 2 cups old fashioned oats
    • 1/4 cup slivered almonds, toasted, *see Cook's Note
    • 1/3 cup miniature chocolate chips
    Directions:

    Position an oven rack in the middle of the oven. Preheat the oven to 350 degrees F.

    Spray a 7 by 10 3/4-inch nonstick baking pan with vegetable cooking spray. Lay a 6 by 18-inch piece of parchment paper in the pan, allowing the excess paper to hang over the sides. Spray the parchment paper lightly with cooking spray.

    In a medium bowl, using a hand beater, beat the egg white until frothy. Stir in the peanut butter, brown sugar, and honey. Add the melted butter, oats and almonds. Stir to combine, then add the chocolate chips.

    Using a rubber spatula, spread mixture into the prepared baking pan, pressing lightly to form an even layer. Bake until the edge of the mixture begins to brown, about 15 minutes. Remove from the oven and let cool for at least 1 hour. Cut into 1 1/2-inch squares and serve.


    *Cook's Note: To toast almonds, arrange in a single layer on a baking sheet. Bake in a preheated 350 degree F oven until lightly browned, about 8 to 10 minutes.

    Recipe by Giada  De Laurentiis

    Thursday, February 10, 2011

    Valentine's Day Cupcake


    Made some cupcakes for Amy's Birthday and decorated these for Valentine's Day. They are vanilla cupcakes with vanilla butter cream frosting, and they have a raspberry mousse filling. I piped on the hearts on top with some raspberry preserve. Then I rolled the edges of the cupcakes in white sanding sugar from Williams Sonoma. The cupcake liners are by Meri Meri, and can be found at Francesca's Collections. Happy Valentine's Day!

    Tuesday, January 4, 2011

    Max's Room


    We are expecting another baby boy at the end of February. His name will be Max Keller and we can't wait to meet this little guy! It is so nice that we will be able to reuse all of Hudson's clothing and baby things. I started working on Max's room a couple weeks ago and we were able to just buy a few colorful books and items to add to what we already had. I made him the pillow with the elephant applique on it, the blanket with his name, and painted the yellow letter "M" and framed it against some matching fabric. I am kind of obsessed with the jelly cat stuffed animals, so we placed a couple of those in his room. You can find them at Anthropologie, and they are the softest, cutest stuffed animals...in my opinion! :) I ordered the monkey bin from 3 sprouts on Amazon.com and will probably use it for a hamper or for toys when he is older. I also just ordered some alphabet flashcards to hang over the closet doors to brighten up that wall. I buy all of my soft fabric to make blankets from Create Your Own Joy Studio. She also sells blankets that are already made, along with other really cute baby items.

    Baby Girl Gift


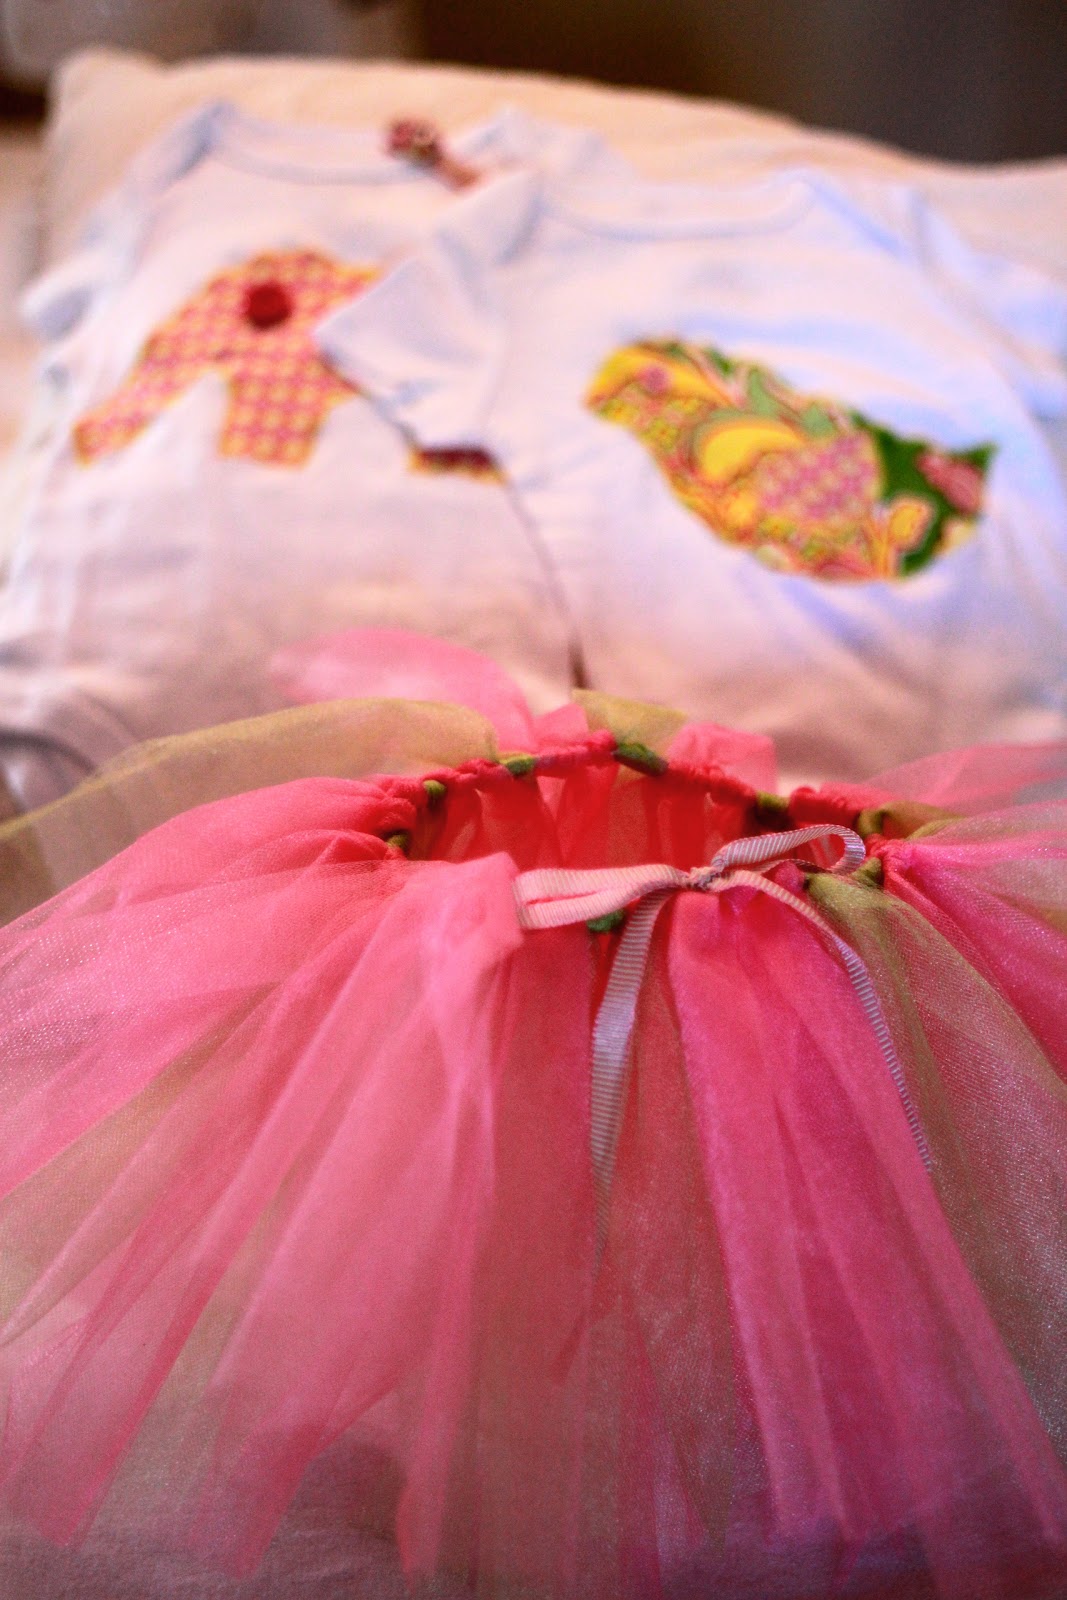
    One of my good friends Jenee is due just four days before me with a baby girl, Tyler Rose. Whenever any of my friends have a little girl I have to jump on the opportunity to make something fun. I made her a couple appliqued onsies, one with an elephant and another with a bird. The tutu is a no sew tutu that is really easy to make. I made the hair clip with ribbon that matches the tutu and a very small fabric yo yo that i made. I found the templates for the appliques on Daffodil Designs. I have link to a previous post on fabric yo yos here. It will direct you to Heather Bailey's website where she gives a step by step tutorial. Click here for a previous post I made about a no sew tutu, and it will give you the basic instructions and supplies needed.

    Saturday, December 11, 2010

    Coconut Cupcakes

    I made some coconut cupcakes for the first time this weekend for a winter themed baby shower. The shower was themed with snowflakes, the colors blue, white, and silver, and sparkly decorations. I tried to make the cupcakes fit right into that. I used a coconut cupcake recipe by Martha Stewart and topped them with cream cheese frosting. I topped some of the cupcakes with coconut that I tinted blue with an edible blue luster dust and the other half I topped with plain white shredded coconut. I decorated the tops with snowflakes that I piped out of melted Almond Bark. I placed the melted almond bark in a decorating bag with a tip #2. I piped the snowflakes onto wax paper and let them set in the refrigerator. Once they set I dusted them with blue and white shimmery luster dust and placed them on top of the cupcakes.


    Makes 2 dozen
    • 3 cups cake flour (not self-rising)
    • 2 teaspoons baking powder
    • 1 teaspoon salt
    • 3 sticks (1 1/2 cups) unsalted butter, room temperature
    • 2 1/4 cups sugar
    • 1/2 teaspoon pure vanilla extract
    • 1 cup coconut milk
    • 8 large egg whites
    • 1 1/4 cups shredded sweetened coconut
    • shredded sweetened coconut for garnish
     Directions:
    1. Preheat oven to 350 degrees. Line two standard 12-cup muffin pans with paper liners; set aside.
    2. In a medium bowl, whisk together flour, baking powder, and salt; set aside.
    3. In the bowl of an electric mixer fitted with the paddle attachment, beat butter and 2 cups sugar until light and fluffy, 3 to 4 minutes, scraping down sides of the bowl as needed. Beat in vanilla. With mixer on low speed, add flour mixture in three parts, alternating with the milk and beginning and ending with the flour; beat until just combined. Transfer mixture to a large bowl; set aside.
    4. In the clean bowl of an electric mixer fitted with the whisk attachment, beat egg whites on low speed until foamy. With mixer running, gradually add remaining 1/4 cup sugar; beat on high speed until stiff, glossy peaks form, about 4 minutes. Do not overbeat. Gently fold a third of the egg-white mixture into the butter-flour mixture until combined. Gently fold in remaining egg-white mixture; stir in shredded coconut.
    5. Divide batter evenly among the muffin cups, filling each with a heaping 1/4 cup batter. Bake, rotating pans halfway through, until the cupcakes are golden brown and a cake tester inserted in the center of a cupcake comes out clean, 20 to 25 minutes. Transfer pans to a wire rack. Invert cupcakes onto rack; then reinvert and let cool completely, top sides up. Frost cupcakes with seven minute frosting, swirling to cover. Cupcakes may be stored in a covered container in the refrigerator for up to 3 days. Garnish with fresh coconut just before serving.
    From The Martha Stewart Show, March 2008


    Read more at Marthastewart.com: Coconut Cupcakes - Martha Stewart Recipes